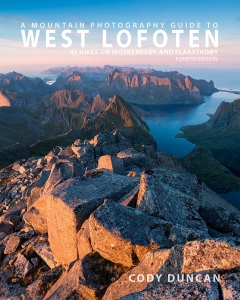
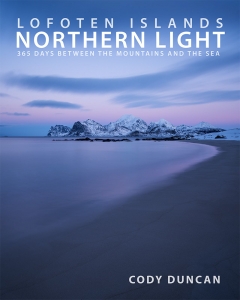
LOFOTEN ISLANDS NORTHERN LIGHTS

When To See The Northern Lights

When the northern lights – Aurora Borealis are strong and bright, get ready for the show of your life as the lights dance across the sky from horizon to horizon in display of nature that I can only describe as truly breathtaking. Not much beats snow covered mountain peaks rising straight out of the sea with auroras filling the night sky overhead. For me, the Lofoten Islands are worth the risk of bad weather to take images of the northern lights that are dynamic and powerful. Something more than just a boring snow field or barren forest in the foreground.

There is no switch to turn on the northern lights. Seeing them primarily depends on a combination of four main elements: darkness, clear skies, extreme northern (southern) latitude, and solar activity. Winter on Lofoten already covers two of these elements: darkness and northern latitude. Clear skies and solar activity are more or less left up to chance. I have experienced some winters where I rarely saw a star over a two week period due to heavy cloud cover, yet elsewhere in the north clear skies brought fantastic aurora displays. Other years I have had multiple clear nights and yet the sky remained silent. Like the weather, there is no way to predict what you will get until you are on the Islands and the twilight is fading into night.

In general, there is a short term level of predictability for the occurrence of auroras, as they usually happen several days after a solar storm. Several websites and apps are available to help forecast the appearance of the northern lights up to about 3-4 days out. Though in my experience, they often appear when they feel like appearing. Some of the best displays I have seen were on forecasted low activity nights, whereas some nights which were predicted to have hight activity were quiet. If I am to give some advice though, I would use the prediction of solar activity level to calculate how much effort you want to put into finding clear skies, should they not exist at your current location.

With low intensity auroras, a faint, almost cloud like glow will appear in the night sky. Barely perceptible to the eye, if you pull out your camera and make an exposure of several minutes, you will see the light is green. When the northern lights are strong, the green color will be readily visible to the naked eye and if your lucky, reds and pinks might also appear. On these nights, you really know you’re seeing the northern lights as they swiftly move across the sky.

Historically, March and October typically have the greatest occurrence of solar activity. And while there is sufficient darkness by late afternoon during winter, I find the northern lights don’t typically appear until 20:00 – 21:00 or later. Generally, the earlier in the evening they appear, the stronger the display, but this is not always true. If you haven’t seen anything by midnight, then they are probably not going to occur.

Late August – First auroras appear in the sky

September – March – Main aurora season on Lofoten

Mid April – Last auroras visible as the nights grow lighter

Lights Over Lofoten

Photographing the northern lights on Lofoten can be both a rewarding and frustrating experience. While the dramatic landscapes and coastlines of Lofoten provide near limitless compositional opportunities, the equally dramatic winter weather can leave you longing for even an hour of clear skies. If the northern lights are your main purpose of traveling to Lofoten, then it’s possible you’ll be left disappointed when the sky remains stormy for a the duration of your visit. Rather, I like to think of any appearance of the lights as an added bonus to what is already a world class landscape.

The coastal areas of Lofoten are often the best locations for shooting the northern lights. That being said, there are a few things to keep in mind. First, most Islanders live near the coastline.  This means that you should be aware of light pollution, even on seemingly distant shorelines. Next, pay attention to how open the horizon is from the northwest to the northeast, as this is typically where the aurora will appear. If you have mountains rising too steeply in front of you, then any low level auroras may be blocked from sight.

The dramatic rising peaks across the fjord from Reine are one of my favorite aurora locations. The mountains rise steeply from the fjord providing a dramatic setting to the scene, yet are far enough away so as not to block most aurora displays. Additionally, there is easy access to a multitude of shooting directions, allowing for compositional flexibility, depending on where the auroras are appearing in the sky. Even driving a few minutes down the road can provide an entirely different looking group of images set against one of Lofoten’s most iconic mountain peaks.

The beaches of Flakstadøy and Vestvågøy are some of the most popular and photogenic locations for shooting the northern lights. Haukland, Vik and Utakleiv beaches, only separated by a short section of road, all face in slightly different directions, letting you move between them as the northern lights move though the sky. Skagsanden beach provides a wide open northern horizon which works well with aurora appearing from multiple directions. The northern coast of Gimsøy also has some small beaches and wide open horizon, but they typically lack any mountains in the background.

Getting away from the coast, there are also multiple inland options for shooting the northern lights. But these typically are more dependent on localized conditions, i.e.. how much snow is on the ground, and often require a bit more planning and exploration to find a scenic composition. Additionally, mountains can also block a majority of the horizon, limiting the viewing angles the aurora may appear in.

Lofoten Islands Northern Lights

BEST LOFOTEN AURORA LOCATIONS

While the northern lights can be photographed more or less anywhere across Lofoten, the list below highlights some of the better locations across the Islands with good possibilities for both composition of the foreground in combination with northern lights overhead.  On good nights, when the aurora are moving about, I suggest visiting several locations vs. remain in one place the whole evening.  If possible, I would also suggest to scout any location you’re thinking of during the daylight, so you at least have some familiarity of where to go in the darkness as you’re rushing to take a shot.

Reine: A multitude of views possible, from the tourist viewpoint over the harbor to include the city, to areas down on the fjord to avoid any lights in the foreground. A good variety of shooting angles are possible from northwest into the back of the fjord, to directly east across the open waters of the Vestfjord. Though the mountains rising on the north side of the fjord are some of the most dramatic on Lofoten, they will suffer from severe light pollution with anything less than a quarter moon, taking on an ugly orange color cast.

Hamnøy: One of the most popular locations on Lofoten due to the fact that many photographers stay at the Elliassen Rorbu, so you don’t have to go much past the front door. With the auroras shining overhead, you will be bumping tripods with dozens of other photographers here. You can find a bit more space if you walk a few hundred meters to Toppøy. Same as above, the peaks across the fjord suffer from light pollution with anything less than a quarter moon.

Skagsanden beach: This beach has grown in popularity recently as it is the first nice beach reached from the Reine area where most of the photo workshops stay. The beach faces northwest, with good open skies continuing to the north. With some nice rocky areas on the side of the beach, a variety of compositions are possible here.

Uttakleiv beach: Another of the more popular beaches, the classic Uttakleiv view with northern lights overhead is a coveted one among photographers. Sky is open from the northwest to north. Any aurora from a more easterly direction will be mostly blocked by the massive Himmeltindan. Light pollution not too bad, but a bit of moonlight helps with the scenic foreground here.

Haukland beach: Facing south west, with mountains directly north and east, Haukland works best in strong aurora displays when the lights are well overhead or have swung around to a more southern or western direction.

Vik beach: Similar to Haukland, but more open to the north, I often start my wait for aurora here as the horizon is fairly visible. With Uttakleiv and Haukland just down the road, Vik also works well with shifting auroras if you need to change locations quickly.

Unstad beach: While Unstad is one of the more scenic beaches on Lofoten, it unfortunately has quite limited angles in which the northern lights need to appear, making Unstad a bit of a gamble. Best to save Unstad until after you have been to several other locations and have some good shots. Minor light pollution, but like Uttakleiv, some moonlight is beneficial for the rocky foreground.

NORTHERN LIGHTS PHOTOGRAPHY TIPS

Setup

Aurora photography is a much more active experience than typical night photography situations. If you are lucky to experience a solar storm then the sky will be dancing with light that neither words nor photos can properly describe. This can cause photography brain freeze, which combined with the darkness allows simple mistakes to happen which might affect your images.

It is good to get familiar with the basics of your camera so that you can use it in the dark on not need to turn your headlamp on – which is a great disturbance to others if you are photographing in a crowded area. Know where the buttons are for shutter speed, aperture, ISO. Know how to switch between auto and manual focus. Know how to zoom in on the image display while focusing and while reviewing images to verify sharpness.

Standing around at night for hours gets tiring. If you have a heavy backpack, there is no reason to wear it all evening – and always be careful if ever putting it down in the darkness with an incoming tide, you’re likely going to be looking at the sky and not see the waves getting nearer – I’ve witnessed some close calls! And in all likelihood, you are not going to be changing lenses on need anything from your backpack anyhow. So just the camera, a few extra batteries kept warm in your pockets, maybe an extra memory card, some lens wipes, in case of condensation/fogging, and your tripod are all that’s really needed.

It not likely you will to be alone at any of the beach locations on Lofoten. For the sake of all other photographers, keep headlamp usage as limited as possible. I don’t mean you need to walk in the darkness and trip and fall. But you’re probably just walking down to a beach and only need to see your feed, so there’s no need for 18.7 million lumens and a light so bright that it reaches the moon. And contrary to popular belief, don’t use the ‘night red.’ This actually ends up much more distracting should it end up in a photo, especially on snow.

Be aware of your surroundings in general. If there are already people at a location, it is often best to line up next to them and shoot in the same direction – though this doesn’t work at every location unfortunately. When the ‘go in front of each other’ game begins, then all that happens in everyone ends up walking the entire length of the beach…

Focus

If the moon is out, use that to focus on, as it will be the brightest object in the sky. If there’s no moon, then try and find some distant house lights to focus on. If this is also not an option, then do your best to focus manually on the stars – the most difficult option. Once you believe you’re in focus, put you camera into manual focus mode, and don’t touch the lens!

Always take a test shot to check focus and zoom in on the image to verify sharpness. There is nothing worse than getting back to your rorbu and discovering you have a whole collection of out of focus images.

It is a good idea though to check your focus again at regular intervals. When shooting at night, probably with bulky gloves, while moving the camera around, it can be easy to hit the focus ring by accident. when recomposing, I recommend to clients to always use your right hand for grabbing the camera, by the camera grip, and using your left hand to adjust the tripod. If you grab the camera with your left hand, it is much more likely you’ll touch the lens and perhaps adjust the focus accidentally.

Exposure

The first initial aurora of the night can often be a faint glowing arch and be nearly identical to a cloud in appearance, especially if the sky is already partly cloudy. Take out your camera and do a quick exposure: if the ‘cloud’ is green, then you have northern lights. If the cloud is orange or white, or any other color, it’s just a cloud.

There is no single correct setting for aurora photography as the conditions on the ground, snow vs. no snow, and the sky, moon vs. no moon and any remaining ambient light on the horizon, are always changing. The exposure needed on a moonless night with only a faint aurora will be several stops of light different than a night with a full moon shining across fresh mountain snow.

However, you do need to start somewhere: ISO 2000, f/2.8, 8 seconds – is a good starting point to get something on your camera, and then adjust brighter or darker from there.

I recommend shooting in manual exposure mode. You do need to take some care of the intensity of the aurora. It is easy for a dim aurora display to suddenly double or triple in brightness within a few short moments, blowing out your exposure if you don’t compensate.

When photographing the northern lights, be sure to check your exposure with the RGB histogram, not just the apparent brightness on the display screen. As your eyes adjust to the darkness, your camera’s screen will begin to appear artificially bright. Without referencing the histogram for exposure, you might return to your room and suddenly find you have a bunch of underexposed images.

As the speed of the aurora movement increases – your shutter speed should decrease. That is to say, If the aurora is just a light glow in the sky, not really doing much, you can get away with a lower ISO and a longer shutter speed – It’s basically just night photography with some green. However, when the aurora begins to dance across the sky, you want as fast of a shutter speed as your camera will allow – of course this is a trade off between increasing ISO and thus noise while having a sharper aurora vs. less noise yet a softer, more glowing aurora. There is no correct answer here, you have to take from one to give to the other.

When the lights are faint and amorphous, and particularly if there are some clouds swirling over the mountain peaks, it can be useful to lower the ISO and open up the shutter for some long exposures to let the movement of the clouds better balance with the aurora for a more subtle look to the scene.

While I see it often advised to photograph the northern lights without the influence of moonlight, I am of the opposite opinion and think that the addition of moonlight greatly benefits the scene. Moonlight will only influence the weakest displays of aurora, and to be frank, these dark, faint displays aren’t that spectacular to photograph anyhow. When you see a good aurora, you will know it, and moonlight will have no effect on this. Without moonlight, most of the landscape from foreground to distant mountain peaks will be overly dark, or worse, glow bright orange due to light pollution – one of the reasons you might notice many photos have colorless, black and white looking mountains/foreground as people attempt to remove the ugly color cast from their images. Many might shoot multiple exposures and combine them later, but I think the added light from the moon helps to add depth to the scene and better balance to the elements of land and sky.

Composition

If you just wanted to see the northern lights, you would have gone to Tromsø. You have come to Lofoten because when all the elements come together, the beaches and mountains offer some of the most dynamic landscapes possible for aurora photography. Of course, this is over simplifying things, and it’s hard to predict where in the sky the aurora might appear, but the possibilities here exist.

After the initial excitement of seeing green in the sky wears off, and you’ve taken a few dozen images pointed mostly towards the sky, take a bit of a pause and look at the landscape around around you. How would you compose the image if the aurora was just clouds? I often like to include more foreground in many of my images, or shoot vertical panoramics – foreground image – sky image, if the aurora is high overhead, yet I still want a foreground to anchor the composition. The simplest and one of the most effective techniques is using the reflection from a beach or lake (though the lakes are mostly frozen in winter).

The above being said, it is more simple in theory than practice, especially as a active aurora will be continuously moving throughout the sky, and the shape of the aurora itself might have a large affect on the composition and balance of the image. Often times I find myself with a nice foreground then wishing I could move the aurora to a different part of the sky. But it does what it wants, which is part of the magic! It’s not easy…

AURORA PHOTO EXPOSURE EXAMPLES

Lofoten Islands Northern Lights

EXPOSURE SETTING

22:34
ISO 2500
f/1.8
8 Seconds

Lofoten Islands Northern Lights

EXPOSURE SETTING

22:48
ISO 2500
f/1.8
1.3 seconds

Comparing these two images taken just 14 minutes apart you can see the difference in brightness as the aurora exploded across the sky. From my camera settings, it is 2 2/3 stops of light brighter on the right image. And even at 1.3 second exposure, the aurora is less defined than the 8 second exposure on the left image – the right aurora was moving so fast through the sky.

EXPOSURE SETTING

20:08
ISO 2500
f/2
3 seconds

Lofoten Islands Northern Lights

EXPOSURE SETTING

00:13
ISO 2000
f/1.8
1.3 seconds

The same location under different lighting conditions. The right image was a few days after a full moon with fresh snow. The left image a few days before a new moon and with minimal snow – despite being winter. The aurora itself is of similar brightness in both images – both nights were fantastic – yet the moonlight and snow created a 1 1/3 stops of light difference between the images

EBOOKS

Kungsleden North - Abisko to Kvikkjokk
Kungsleden South - HIking From Kvikkjokk to Hemavan
Padjelantaleden Sweden - Hiking From Kvikkjokk to Ritsem
Northern Light - Lofoten Islands

MORE LOFOTEN TRAVEL RESOURCES