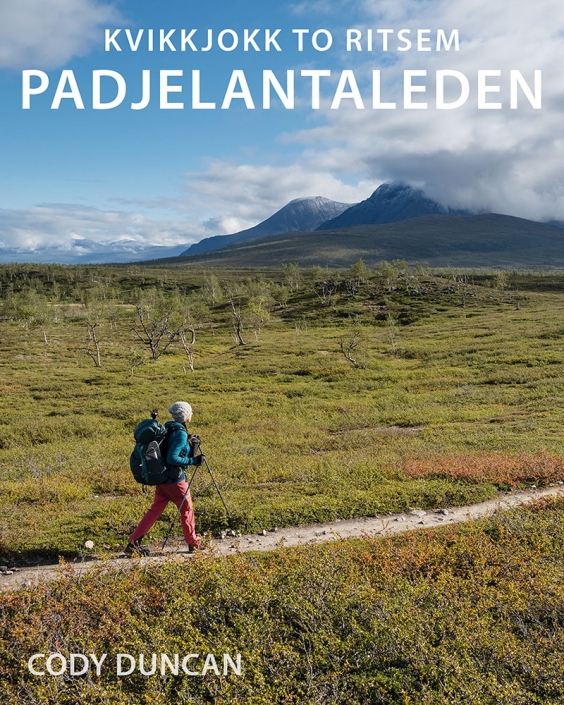
HERMANNSDALSTIND HIKING GUIDE
Sørvågen, Moskenesøy
1029 meters
9 km
Hard
5-7 hours
At 1029 meters above the see, and as the only 1000+ meter mountain in western Lofoten, Hermannsdalstinden towers above everything else in the surrounding landscape. The long, and at times, steep and slippery hike is rewarded by a spectacular view of the endless mountain peaks of Lofoten until the horizon finally fades away in the distance.
Getting There
There are two main approaches to Hermannsdalstinden: the longer, hiking only option beginning in Sørvågen, and the shorter, but steeper route beginning with a ferry ride to Forsfjord. I will give details on both routes and suggest making a round trip of the mountain, beginning in Forsfjord and exiting in Sørvågen.
Sørvågen
The trail begins on the north side of the lake Sørvågvatnet (the large lake in the middle of Sørvågen). There are trails approaching from either side of the lake, but the best parking is on the west side of the lake, so I will provide directions for this.
Driving into Sørvågen heading west (in the direction of Å) you will pass lake Sørvågvatnet on the right. Look towards the waterfall at the far side of the lake, as this is where you will pickup the trail. Next will pass the large building of the school on your left. Now shortly after, you will see a white sign marked ‘Holmen,’ just before a small road on the right with a bunch of mailboxes on the corner. Go right on this road (not towards Holmen, which is left). After several hundred meters, there will be a fork in the road, continue right, and you will see the large parking area. Park here.
Take the pathway next to the building at the end of the parking area and follow it towards the back of the lake. As you near the waterfall, you will see the trail. Cross the small bridge over the river and continue up the hill.
Forsfjord
Overall, this route is shorter, but much steeper and demanding in the beginning. It connects with the Sørvågen about halfway, at hill 448. Once you begin this route, there is not really an option of turning around other than a difficult hike to Vindstad or continuing on via Munkebu hut to Sørvågen. This trail begins steep and slippery, I do not recommend it on rainy days.
The route begins in Reine, where you will take the Vindstad/Bunes ferry. Tell the captain that you will go to Forsfjord. Sometimes it is the first stop, sometimes they stop after Bunes. It is also a bit on the pricy side, with the cost for a one way trip being 160 NOK as of summer 2016 (whereas to Vindstad is 60 NOK).
The ferry will drop you off at the small pier in Forsfjord. The trail begins on the right side behind the large power station building. The trail is narrow and overgrown, but look for the red painted rocks to begin your journey.
The Trail
Sørvågen – approx. 9km
Leaving lake Sørvågvatnet the marked and well worn trail climbs up to the shores of Studalvatnet where it levels off as you traverse around the eastern shores of the lake. After walking around the small bay (and hut), lookout for a trail leading steeply to the right and up the hillside. Take this. You will now leave the lake and encounter the first steep section of the hike where you will need to use the assistance of chains to help you ascend the somewhat steep, and quite slippery if wet, sections of rock.
Now the trail levels out once more as you meander through some boggy section towards the back of another lake. Once reaching a few small ponds, you will again climb up a rocky hillside heading towards the right. There are multiple paths up this section, so choose whatever looks best for you. Keep an eye out for small cairns to make sure you’re still roughly on track.
Next, you’ll find yourself back on a well worn, sometimes boggy trail and heading up towards Djupfjordheia. Once reaching the summit, you then descend on the trail down towards Munkebu hut. You are now roughly at the half way point.
Head behind the huts to the left as the trail now descends to the ridge (where the power lines are) separating the two lakes. Follow the trail as you pass under the power lines and then once again climb. Once the trail begins to level out, you will pass some rocky sections before turning right (north) towards hill 448, between the two lakes.
Once near the summit of hill 448, you will pass a small lake. Take the trail towards the left and you will begin to descend on the right side of lake Krokvatnet. There are some short, but very muddy and steep sections along the trail here. You should be able to look ahead and see where the trail will take you up the steep ridge.
…Continued below.
Forsfjord – approx. 5.5km
Departing the ferry in Forsjord, walk around to the right side of the power station building. Here you will see the trail begin on the back side of the building, follow this up the mountain.
The trail gradually steepens and might at times become slightly obscured by the bracken, but if you find yourself without a path to follow, then you are off course. In places the trail can be steep and slippery, you will need to grab at the bracken to climb as you lose traction in the muddy steps.
After a hundred meters or so of ascent the trail now enters a few rocky sections, some of which are steep. Soon after this you will find yourself reaching the shores of lake Tennesvatnet at 239m.
Continue towards the right on the obvious trail as you begin the ascent of hill 448. Again, the trail is steep and slippery at times with some sections of moderate exposure.
At hill 448, look for a trail heading of towards the right (north) and towards Hermannsdalstinden in the distance. Continuing straight/left from hill 448 will take you towards Munkebu hut and Sørvågen.
You will now descend a short, but steep and slippery section of trail towards lake Krokvatnet.
…The trail continued…
Once reaching the low point near lake Krokvatnet the trail now traverses the left side of the steep cliff. There is some exposure here at times, but it is better than what you just descended. The trail soon begins to level out again and you will pass a few small ponds as you near the steep ridge ahead of you.
From a distance, the ridge is steep and foreboding looking, but as you near, you’ll notice that it’s not quite as bad as it looks. Here is the most difficult part of the hike. Using the rope for assistance, you will climb several sections of steep and muddy rock. Then you will reach a second section of steep rock that you will need to ascend before topping out on a small plateau.
If you have gotten this far, then most of the hard parts are over, though the summit is still some 350 meters of ascent away.
Follow the trail along the right side of the small plateau before it begins wandering through the rocks and zig zagging up the mountain. The trail should be clear most times, but keep an eye out for cairns and red trail markers.
The trail begins to steepen as you near the final approach to the summit and cross several sections of loose rock as you approach the large boulders making up the summit. Keep an eye out for the red trail markers painted on the rocks, as they seem to lead towards the easiest approach to the summit.
The trail wanders in a bit of a maze as you search for the easiest way through the boulders where some sections of easy climbing will be required. This should still be easier and less exposed than what you ascended on the ridge below. If you find things getting too difficult, then you might be off course.
A final climb up a rocky, loose gully gets you more or less on the summit. Pick your way through the boulders to gain the high point and congratulate yourself.
Camping
Hermannsdalstind makes for a long and strenuous day hike, so I recommend an overnight trip on the mountain. Plus the scenery is wonderful, so why not spend the night!
You will have several good camping options, depending on how long you want to carry your camping gear, and how long you want just the hike of the summit to be. If you are a photographer like me, you will probably prefer to be as near to the summit as possible so as to be there for sunrise or sunset. If you are just out for an enjoyable hike, then staying near Munkebu hut probably makes the most sense.
Munkebu hut: This is a good halfway point for the mountain. You can choose to either stay in the hut (you’ll need a DNT key, or rent one from the tourist info in Moskenes) otherwise there are plenty of places to pitch a tent. Water available.
Hill 448: This will be your next best camping option, or the best place if coming from Forsfjord. There are multiple locations for a tent that are relatively sheltered from the weather. Water available.
Summit: For the brave, there are a few places to bivy on the summit. I found a flat rock just below the top, although while totally exposed, it was the best place for an open air bivy on a calm night. There are several slightly more sheltered options, but they can be a bit muddy or rocky. There are a few places where a free standing tent with a small footprint might be possible to set up, but you will need to look around. There is also a somewhat hidden shelter built among some rocks just below the true summit, but it looks as like it might have been used as a toilet by some, so I would only suggest using as a last resort. No water.